16 Different Types of Tie Knots
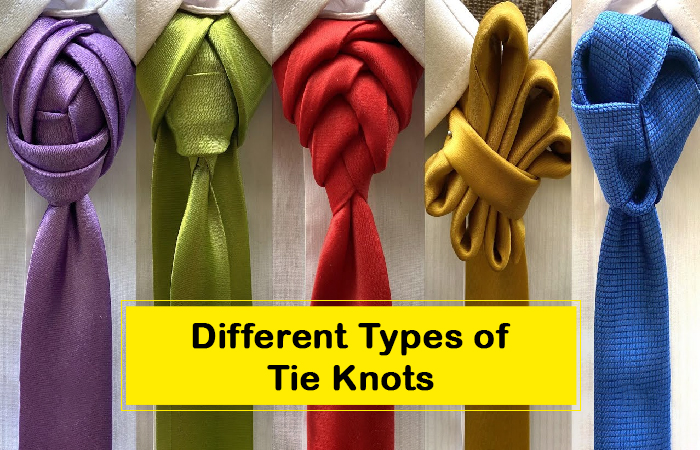
Tie knots are an essential part of men’s fashion, and knowing how to tie a knot correctly can make all the difference in your appearance. A perfectly tied knot can take your outfit from looking sloppy to sleek, and it’s a skill that every man should master. However, with so many different types of knots to choose from, it can be overwhelming to know where to start. Let’s take a closer look at the different types of tie knots and provide step-by-step instructions on how to tie each one. Whether you’re getting ready for a job interview, a wedding, or a night out, mastering the art of tie knots is sure to impress.
Learn How To Tie a Knot Step by Step
Tying the perfect knot is a breeze when you follow our simple step-by-step approach to tie knot mastery.
Say goodbye to tie knot frustration and hello to style confidence with our extensive list of tie knot styles, complete with detailed instructions and tutorials.
1. Visualize your way to tie knot success with our detailed infographics that guide you through each step of the tying process.
2. Achieve knot-tying mastery with ease by following our simple bullet-pointed steps that break down each tie knot style.
“Knot Mastery: Unraveling the Art of Tying 16 Different Types of Ties
1. Four In Hand Knot
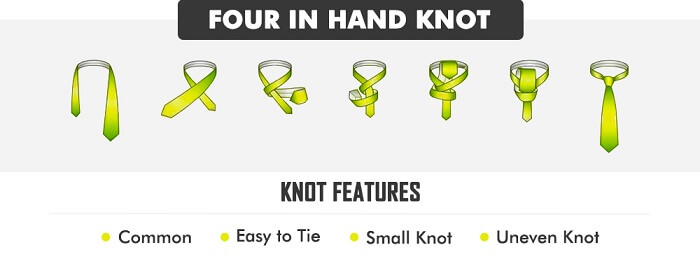
1. Wrap the tie around your collar, placing the thick end on the left, dangling around 3-4 inches below the thin end.
2. Next, pass the wider end from the left over the thinner one on the right.
3. Again, cross the thick end horizontally from right to left under the thin end.
4. Cross the thick end from right to left horizontally across the front of the knot. Put a finger underneath the horizontal band.
5. Rotate the thick end’s tip inward and upward before sliding it under the loop around your neck.
6. Now push the thick end down through the finger-held-open loop.
7. Insert the thick end into the loop and tighten the knot.
8. Firmly hold the tie in one hand to tighten the knot while pulling its thin end with the other.
Used for: Beginners
Level of difficulty: Easy
Size of the knot: Small knot
Knot Features: Common, Uneven knot
Tie Length: Less of the tie’s length, regular length
Most suitable for: Tall men
Recommended Collar: Narrow spread collars, button-down collars, Point collars
Shirt Type: Dress Shirt
Tie Fabric: Silk, Wool, Cotton, Linen
Formality: Less formal occasions
Shape: Asymmetrical shape
Advantages
- The Four In Hand Knot is relatively small, which means that it doesn’t use up too much of the tie’s length.
- The asymmetrical shape and slightly narrow knot give a casual and relaxed look.
- The knot is suitable for most tie and collar types.
- The Four In Hand Knot is one of the easiest knots to learn and can be done quickly with minimal effort.
Disadvantages
- It might not be the best choice for those who prefer a more formal or symmetrical look.
- Some people might not like the smaller size of the knot, which could make it look out of place with certain shirt collars.
- It’s considered to be more informal than other knots.
- The Four In Hand Knot is generally not suitable for wider ties as it can create a lopsided and unbalanced appearance.
2. Half Windsor Knot
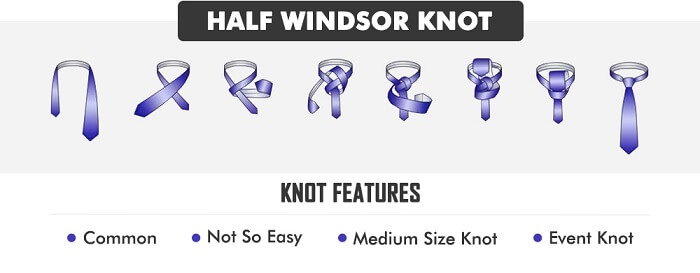
1. Wrap the necktie around your collar with the thin end on the left resting just below your rib cage and the wide end on your right hanging up to your thigh.
2. Make an X-shape beneath your chin by bringing the wide end from right to left ahead of the thin one.
3. Wrap the tie’s wide end horizontally around the thin end and behind it.
4. Insert the wide end through the X’s opening after bringing it from the top and pull tightly.
5. With your right hand still holding the wide end, loop it around the thin end from right to left.
6. Holding the triangle firmly in place with your left hand, pull the broad end to your chest and cross it over the X from behind the loop.
7. Using your left hand’s index finger, spread the triangle formed over the X, and pull the broad end through.
8. Pull the tie’s narrow end down while pulling the knot up near your collar to change the length. To make sure the horizontal loop is smooth and even, it might need to be adjusted.
Used for: Beginners
Level of difficulty: Not so easy
Size of the knot: Medium size knot
Knot Features: Common, Even Knot
Most suitable for: Big and tall men
Recommended Collar: Point collars and button-down collars
Shirt Type: Dress shirts
Tie Fabric: Silk
Formality: Formal, wedding, Business Meetings
Choice to pair with: Double-breasted suit
Shape: Symmetrical triangular shape
Advantages
- The Half Windsor Knot is a versatile knot that can be worn with a variety of collars.
- This Knot is symmetrical, which can make it a good choice for those who prefer a balanced and formal look.
- This can make it a good choice for those who want a moderate-sized knot.
Disadvantages
- Not Suitable for All Tie Types.
- The Half Windsor Knot may not be suitable for all collars.
- The Half Windsor Knot takes longer to tie and may not be as convenient for those who are in a hurry.
- It is still less formal than the Full Windsor Knot.
3. Full Windsor Knot
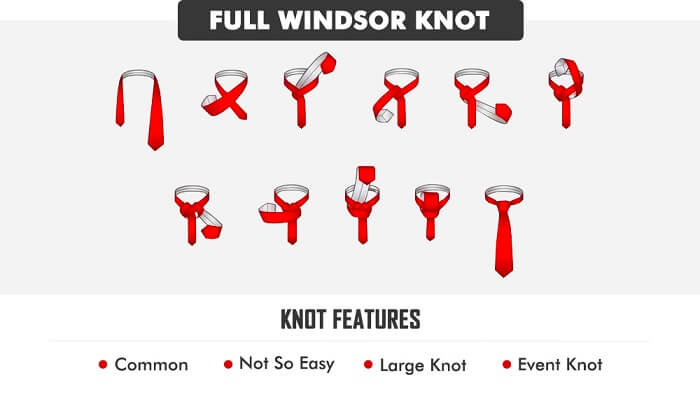
1. Wrap your collar in the necktie, leaving the broad end on the right dangling 4-6 inches below your waistband.
2. Create an X with the broad end horizontally crossing before the slim end, right below your chin.
3. Bring the broad end out behind the X and tuck it up and behind the loop across your neck. To secure the X, use one finger.
4. Ultimately lower the broad end.
5. Pass the broad end horizontally from right to left after wrapping it around the knot.
6. Flip the broad end tip upward and pull it over the front of the knot in a diagonal motion.
7. Bring the broad end back down after wrapping it over the top of the loop across your collar. Ideally, it would appear on the left of the thin end.
8. Bring the broad end from left to right, horizontally across the front of the tie knot. It will result in a horizontal band that can be secured by putting a finger through it.
9. One more time, pass the broad end underneath the loop and around the collar with the tip pointing up.
10. Spin the broad end downward and feed the tip through the horizontal loop you created in step 8 by pinching it with your finger.
11. Smooth any wrinkles or slack in the knot by pulling the broad end down.
Used for: Expert
Level of difficulty: Not so easy
Size of the knot: Large knot
Similar name: Double Windsor, Scappino knot
Knot Features: Common, Even knot
Most suitable for: Tall men
Recommended Collar: Spread or cutaway collar
Shirt Type: Dress Shirt
Tie Fabric: Silk
Formality: Formal, job interviews, presentations, and social occasions
Choice to pair with: Waistcoat
Shape: Large, triangular symmetric shape
Neck: Large neck
Advantages
- The Full Windsor Knot is the most formal of all knots.
- The knot is symmetrical, which can make it a good choice for those who prefer a balanced and formal look.
- The knot is larger which can make it a good choice for those who want a bold and eye-catching look.
- The Full Windsor Knot can be worn with a variety of collars and is suitable for both formal and casual occasions.
Disadvantages
- The Full Windsor Knot is more complicated to tie than the Half Windsor Knot which may require more practice to master.
- This may not be convenient for those who are in a hurry. It’s Time-Consuming.
- The knot is very large, which can create a bulky appearance and may not be suitable for all shirt collars.
- The Full Windsor Knot is not suitable for all tie types.
4. Nicky Knot
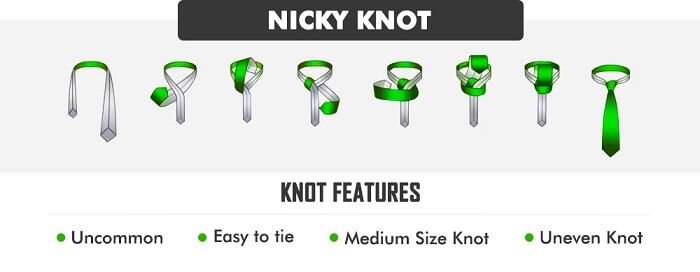
1. Start by wrapping your necktie around your collar approximately two inches lower than your desired finished position, with the seam facing outward and the thick end on your left.
2. Create an X-shape behind your chin by crossing the thick end below the thin end.
3. To the left of the thin end, tuck the thick end into the loop around your collar and flip it up in front of the circle.
4. Cross the front of the knot with the thick end’s tip held horizontally. Put a finger in the gap you just made in the horizontal band across the front of the knot.
5. Tuck the thick end’s tip beneath the loop around your collar.
6. Pass the thick end’s tip through the horizontal loop you made in Step 4 and tuck it inside.
7. Completely insert the thick end into the horizontal loop and tighten it.
8. Hold the knot in place with one hand while tugging on the tie’s thin end with the other.
Similar name: Pratt knot
Level of difficulty: Easy
Size of the knot: Medium size knot
Knot Features: Uncommon, Uneven Knot
Tie Length and Width: Minimal length, shorter ties
Most suitable for: Tall and broader-shouldered men
Recommended Collar: Medium spread to the slightly cutaway collar, button down
Tie Fabric: Silk, thin or a thick fabric
Formality: Casually, formal occasion
Choice to pair with: Jacket to make everyone in the office envious
Shape: Simply bigger but slightly asymmetrical
Advantages
- The Nicky knot is a bit more unique and eye-catching.
- The Nicky knot is still relatively easy to tie compared to some other advanced knots.
- Takes less number of moves (steps) to get tied as compared to the much bigger Windsor knot.
- Can be worn with skinny ties.
Disadvantages
- The Nicky knot is a bit larger and more asymmetrical than other knots, it may not be appropriate for all settings or occasions.
- The Nicky knot looks a bit sloppy or unkempt, especially if the knot is not tied tightly.
- Depending on the length and thickness of your tie, you may need more material to tie a Nicky knot.
- May come undone easily.
5. Bow Tie Knot

1. To begin, drape the bow tie over your neck so that the right side is longer than the left and the seams face the bottom.
2. Form an X directly below the chin by crossing the right and left ends.
3. To tie a basic knot akin to the first knot made while tying shoelaces, loop the longer end under the ‘X.’ Keep a firm grip while letting the more extended end rest on your shoulder.
4. Fold your index finger into a bow shape by putting it on the broadest section of the shorter end’s curve. With the shorter end as near to your neck as possible, place the folded tip across your collar.
5. Holding the bow you just made in your left hand with your forefinger and thumb, cross the longer end across the shorter end in the middle of the bow.
6. Fold the longer end back towards your chest with your right hand, squeeze the fold, and double the tip over to form a wing.
7. Fold the longer end’s folded tip behind that of the shorter end and pass it through the small loop created by passing it up behind the knot.
8. Pull the loops behind the wings to tighten the vertical front knot while they are still in position.
9. To make the wings symmetrical keep wriggling and hold the front of the knot firmly with one finger.
10. Finalize your modifications and verify that your bow tie rests horizontally flat on your collarbone.
Used for: Beginner, Expert
Level of difficulty: Not so easy
Size of the knot: Medium knot
Knot Features: Common, Even knot
Tie Length and Width: Length: 14 inches for a smaller neck size to 18 inches for a larger neck size, Width: 2 inches for a slimmer bow tie to 2.5 or 3 inches for a wider bow tie
Most suitable for: Tall men, Short men
Recommended Collar: Wing Collar, Spread Collar, Button-Down Collar
Shirt Type: Dress shirt and Casual shirt
Tie Fabric: Silk, Cotton, Linen, Wool, Polyester
Formality: Formal, Wedding, casual or ultra-formal occasion, Club, black tie events
Choice to pair with: Dress shirt, tuxedo shirt, Suit
Shape: Small Bow Tie Knot, Parallel Bow Tie Knot, Cross Bow Tie Knot, Classic, Butterfly, Diamond Tip, Batwing bow tie, Rounded club bow tie, Pointed bow tie
Advantages
- Bow ties are generally seen as more formal and elegant than neckties.
- Bow ties can be a way to add some personality to your outfit.
- You can also experiment with different styles of bow tie knots to find one that suits your personal taste and the occasion.
Disadvantages
- Tying a bow tie knot can be more difficult than tying a necktie knot, especially if you’re not used to the technique.
- It’s important to consider the dress code and tone of the event before opting for a bow tie.
6. Kelvin Knot

1. Hang the necktie two to three inches below the final position by wrapping it over your collar with the thick end on your left and the seam pointing outward.
2. Cross the thick end below the thin one to form an X-shape beneath your chin, from left to right.
3. From right to left, bring the thick end back over the front of the knot. While wrapping it around the narrow end, pass it behind the knot from left to right.
4. Bring the thick end back over the front of the knot, again from right to left. This will make a horizontal band; you can slide a finger below.
5. Position the thick end upward beneath the collar-loop loop.
6. Pass the thick end’s tip through the horizontal loop you made in Step 4 but not the smaller one from Step 3.
7. Squeeze the knot firmly into position by pulling the thick end through the horizontal loop.
8. Pull slightly on the thin end of the tie while holding the knot firmly in one hand to tighten the tie.
Used for: Beginners or experts
Level of difficulty: Easy
Size of the knot: Medium knot
Knot Features: Uncommon, Even knot
Most suitable for: Smaller faces
Recommended Collar: Point collars and button-down collars, cutaway, and spread collars
Shirt Type: Dress shirts
Tie Fabric: Silk or a silk blend, wool, cotton, and linen
Formality: Business, social events
Shape: Symmetrical Triangular shape
Advantages
- The Kelvin Knot produces a symmetrical knot that looks neat and professional.
- The Kelvin Knot is relatively easy to tie and can be learned quickly, even by beginners.
- The Kelvin Knot can be used with a variety of different necktie fabrics and widths, making it a versatile option.
Disadvantages
- The Kelvin Knot is a relatively bulky knot, which may not be suitable for all necktie fabrics or collar types.
- Limited adaptability.
- Not be suitable for the most formal events.
- Knots may come undone more easily than other knots.
7. St Andrew Knot
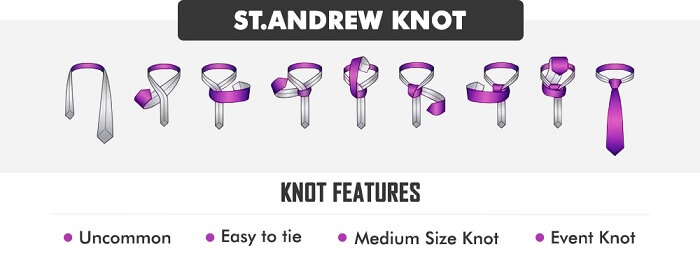
1. Wrap the necktie over your collar with the thick end on your left and the seam facing out two to three inches lower than the final position.
2. To create an X-shape under your chin, cross the thick end beneath the thin one horizontally.
3. Lay the thick end over the thin end’s front horizontally.
4. As you loop the thick end around the thin end, pass it from left to right behind the narrow end.
5. Tuck the thick end back down behind the knot after flipping it vertically up and over the front of the knot.
6. Position the thick end to the left of the wide end.
7. Pass the thick end across the front of the knot from left to right. A band will result from this, and you can pass a finger through it.
8. Finally, tuck the thick end through the horizontal loop you created in Step 7 and pull it up behind the knot.
9. Hold it in one hand while carefully pushing on the thick end with the other to draw it all the way through and tighten the knot.
Level of difficulty: Easy
Size of the knot: Medium knot
Knot Features: Uncommon, Even Knot
Tie Length and Width: Medium & slightly narrow
Most suitable for: Rounder faces or broader shoulders
Recommended Collar: Point collars, button-down collars
Shirt Type: Dress shirts
Tie Fabric: Silk, as well as thicker materials like wool or cotton
Formality: Business/professional or social, casual occasions
Shape: Symmetrical triangular shape
Advantages
- Unique and eye-catching knot.
- Flair to any outfit.
- Symmetrical and balanced look.
- Versatile and can be worn with a variety of necktie fabrics and patterns.
- Provides a more intricate and interesting look
Disadvantages
- Can be tricky to tie properly.
- May take some practice to perfect.
- It is not as well-known as other knots.
- May not be suitable for more conservative or traditional dress codes.
- Bulkier knot
8. Balthus Knot

1. Wrap a long tie around your neck, leaving the thick end on your left and the seam facing up. The narrow end should rest in the middle of the chest, while the wide end should hang at least to mid-thigh.
2. Cross the slender end across the broad end.
3. Now bring the wide end to the front, fold it behind the slender end, and cross behind it.
4. On the left side of the forming knot, bring the thick end back up front and loop it over the thin end.
5. Finish up by tucking the thick end behind and to the right of the thin end.
6. Rotate the thick end upward, then wrap it over the knot’s center.
7. Next, cross the thick end from right to left behind the knot.
8. Cross the thick end horizontally from left to right across the front of the knot.
9. Position the thick end upward and behind the knot. Keep the horizontal pass you just made a bit loose.
10. Tuck the wide end into this horizontal pass.
11. Make adjustments by gently pulling down on the thin end while securing the knot with the other hand. The tie underneath the knot should be wide yet reach your beltline in ideal circumstances.
Level of difficulty: Medium
Size of the knot: Large knot
Similar name: Trinity Knot
Knot Features: Uncommon, Even knot
Tie Length and Width: Will need a tie that is at least 57 inches long
Most suitable for: Tall and short men
Recommended Collar: Spread collars, cutaway collars
Shirt Type: A dress shirt, a plain shirt, or a subtly patterned shirt is also a good choice
Tie Fabric: Silk, cotton, wool, and heavier materials
Formality: Any fancy events, fine dining dinners, theater and art events, Fine social dress, too extravagant for business dress
Choice to pair with: Complements any outfit.
Shape: Symmetrical Triangular shape
Advantages
- The larger knot creates a bold and substantial look.
- Provides a more intricate and interesting look.
- The Balthus Knot is a well-balanced knot that looks proportional and polished when tied correctly.
Disadvantages
- Can be difficult to tie.
- Larger and bulkier knot.
9. Hanover Knot
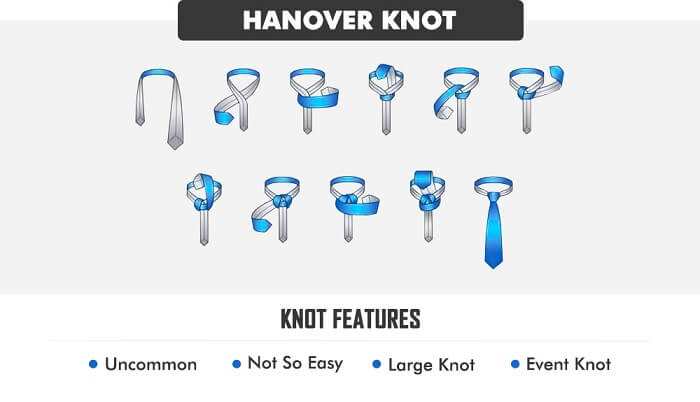
1. Hang the necktie 4-5 inches below the final position by wrapping it over your collar with the thick end on your left and the seam visible.
2. To form an X, cross the thick end beneath the narrow end from left to right.
3. From right to left, bring the thick end over the front of the thin end. A knot will form, which you can hold onto with one hand.
4. Slide the thick end up through the collar loop.
5. Fully lower the thick end and pull it through. However, do not tuck it through the horizontal band you made in Step 4.
6. Turn the thick end around and cross it from right to left behind the knot.
7. Raise the thick end and pass it across the front of the center.
8. Pass the thick end through the loop, letting it dangle to your right as it emerges from behind the knot.
9. Shift the thick end horizontally to the left from the right. A second horizontal band is created underneath which you must insert a finger.
10. Bring the thick end up next, passing it through the loop around your collar again.
11. Insert the thick end into the horizontal band and tighten everything up.
Level of difficulty: Medium
Size of the knot: Large knot
Knot Features: Uncommon, Even Knot
Tie Length and Width: The tie should be of medium to thick width, and the length should be long enough to complete the knot
Most suitable for: Larger men, Men with wider faces/torsos
Recommended Collar: Spread collars, cutaway collars
Shirt Type: Dress shirt
Tie Fabric: Silk, wool, cotton, and polyester
Formality: Business, social (semi-formal at least)
Choice to pair with: Suits, Tweed blazer
Shape: Symmetrical equilateral triangle
Advantages
- Looks impressive and elegant.
- Can be done quickly with a little practice.
- Versatile and can be used with a variety of tie fabrics and colors.
- The knot is large and full, which can help fill out the collar of your shirt.
Disadvantages
- It requires more tie fabric than some other knots.
- Can be quite bulky.
- Hanover Knot is quite formal, so it may not be appropriate for more casual occasions.
- The knot is less common than some other knots.
10. Plattsburgh Knot

1. 4-5 inches lower than the final position, drape the necktie around your collar, leaving the seam visible and the thick end on your left.
2. To create an X, cross the tie’s thick end underneath the small end. The wide end’s tip should be flipped over the front of the loop around your collar while holding on to that X.
3. Bring the thick end back towards your left side after tucking it through the loop.
4. Raise the thick end upward.
5. While keeping to the left of the narrow end, bring the thick end back up in front of the loop.
6. Fold the thick end into the loop before it emerges on your right.
7. Go from right to left, horizontally across the front of the knot with the thick end. Put a finger underneath the band you just made.
8. From the back, tuck the thick end up through the collar loop.
9. Insert the thick end into the horizontal band and tighten it down.
10. Pull on the thin end while holding the knot with one hand and tightening with the other. Make the edges symmetrical by adjusting them.
Level of difficulty: Medium
Size of the knot: Medium Size Knot
Knot Features: Uncommon, Uneven knot
Most suitable for: Men with longer torsos & narrower faces
Recommended Collar: Spread collars (semi or full)
Shirt Type: Dress shirt
Tie Fabric: Silk, Wool, Cotton, Linen
Formality: Business or social wear
Choice to pair with: Suit, Tweed blazer
Shape: Symmetrical and elongated triangle shape
Advantages
- For those who prefer a more understated look.
- Smaller and less bulky.
Disadvantages
- Less impressive and eye-catching than some other options.
- Less common.
11. Grantchester Knot

1. Start 4-5 inches lower than where you want the necktie to wind up and wrap it around the collar. The thick end should be on your left, and the seam should face out.
2. To create an X, cross the thick end below the thin end.
3. From right to left, horizontally wrap the thick end over the front of the thin end.
4. Next, wrap the thick end behind the thin end from left to right.
5. Now cross the front with the thick end from right to left. The horizontal band you just created needs to be held in place with a finger.
6. Tuck the tie’s thick end beneath the collar-loop loop.
7. Let the thick end dangle before the knot after flipping it over. Keep holding the band in place with your finger.
8. Wrap the thick end from right to left around the knot.
9. Now place a finger under the horizontal band you’ve made by wrapping the tie’s thick end from left to right around the knot’s front.
10. From beneath, thread the thick end through the loop on your collar.
11. Insert the thick end through the horizontal band, tighten it, and tug at the knot’s corners to form an even shape.
Level of difficulty: Medium
Size of the knot: Large Knot
Knot Features: Uncommon, Even knot
Most suitable for: Men with larger torsos
Recommended Collar: Full spread collars, cutaway collars
Shirt Type: Dress shirts
Tie Fabric: Silk, Wool, Cotton, Linen, Polyester
Formality: Business or social settings
Choice to pair with: Suits, Blazers, and sports coats
Shape: Asymmetrical shape
Advantages
- Good choice for those who prefer a more understated look or for use with narrow ties.
- Smaller and less bulky.
Disadvantages
- The knot may not be appropriate for very formal occasions.
- Grantchester Knot is less common.
12. Victoria Knot
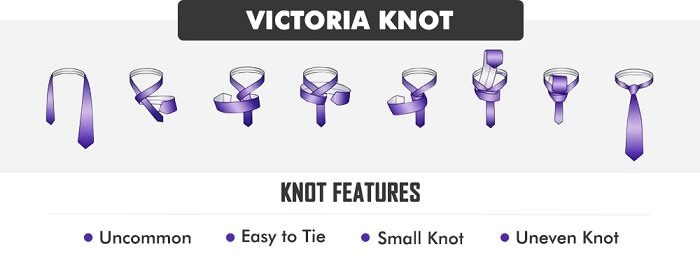
1. Place the necktie about 2-3 inches lower than where you want it to end up. Next, place it around your collar, with the seam facing in and the thick end on your left.
2. Horizontally bring the tie’s thick end before the thin end, then behind it.
3. Pass the thick end across the front once more from left to right.
4. Pass the thick end behind the knot when working your way from right to left.
5. After bringing the thick end across the front a third time, tuck a finger beneath the newly formed horizontal band.
6. Thread the thick end through the collar loop that extends from the bottom.
7. Insert the thick end through the band’s horizontal slit.
8. Tighten the thick end into position. With one hand, hold the knot and gently pull on the thin end with the other hand while adjusting accordingly.
Level of difficulty: Easy
Size of the knot: Small knot
Knot Features: Uncommon, Uneven knot
Recommended Collar: Point collars, button-down collars
Shirt Type: Dress and Casual shirt
Tie Fabric: Silk, Wool, Cotton, Linen
Formality: Business meetings, job interviews, weddings, and other formal events
Choice to pair with: Casual outfits, such as a dress shirt and jeans, Suits, Blazers, Vests
Shape: Symmetrical triangular shape
Advantages
- The Victoria knot is easy to untie at the end of the day.
- Victoria knot can be used with a variety of shirt collars and tie fabrics.
Disadvantages
- Bulkier
- Less Common
- Thicker and fuller
- Time-consuming
13. Cafe Knot
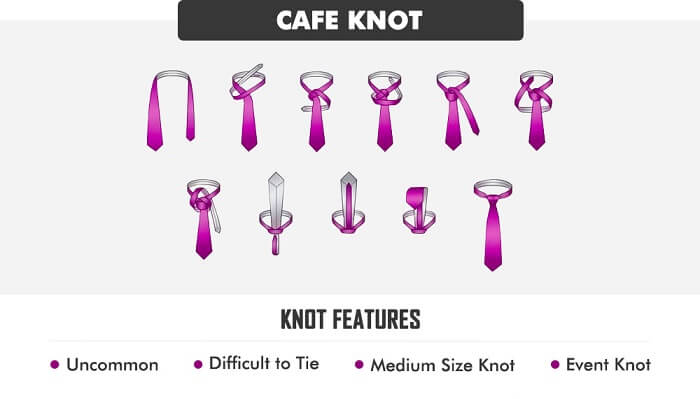
1. Place the necktie over your collar, thick end on your right, seam facing inside, and approximately a half-inch lower than you would like it to hang finally.
2. Form an X by crossing the thin end across the thick end. Then, pass the narrow end behind the X through the loop you just made.
3. Turn the skinny end over the knot’s top.
4. Slide the skinny end from left to right underneath the knot.
5. After that, cross the front with the thin end from right to left.
6. Bring up the thin end through the loop around your neck and behind the knot. As a result, the front of the knot will have a horizontal band.
7. To make the thin end hang down, flip it over the front of the knot.
8. Fold the thin end around the knot from left to right, bringing it just to the left of the thick end.
9. Point the thin end’s tip upward and towards the direction of your left shoulder before tying the knot.
10. Place the thin end on the left side of the large end and tuck it beneath the remainder of the knot in the loop around your collar.
11. Pull the thin end down, then arrange the knot’s center for a minute. The diagonal legs should rise at the same angle and squarely together under your chin.
12. Move the thick up and forward. It may be slung over a shoulder.
13. Rotate the thin end’s point upward, then pass it through the knot’s single horizontal loop at the rear.
14. Completely insert the thin end inside the loop, then tighten it up.
15. Reverse the direction of the tie’s two ends.
16. Carefully tighten the knot by holding it and pulling on the thick end with the other.
Level of difficulty: Hard
Size of the knot: Medium Size knot
Knot Features: Uncommon, Even Knot
Recommended Collar: Point collar, button-down collar
Shirt Type: Casual suit
Tie Fabric: Silk, wool, and cotton.
Formality: Casual/social wear only
Choice to pair with: Casual suit or a dressier sports jacket
Shape: Asymmetrical triangular shape
Advantages
- The knot works well with a variety of tie materials and patterns.
- The cafe knot is a relatively uncommon knot that can add some visual interest to an outfit.
Disadvantages
- Time-consuming.
- It may not be appropriate for all occasions, such as formal business settings.
- The cafe knot is quite large and can create a lot of bulk.
14. Eldredge Knot

1. Wrap the tie over your collar, so the thick end is on your right, hanging where you want it to.
2. Make a divot in the tie’s broad end by pinching it. Now bring the narrow end ahead of the thick one horizontally.
3. Cross the thin end horizontally from right to left behind the cross shape.
4. Insert the thin end through the collar loop.
5. Cross the thick end with the thin end horizontally.
6. Cross the thin end diagonally downward from left to right by tucking the tip through the loop around your collar and flipping it over the top of the knot. To create a diagonal band along the knot’s right side, pull it down firmly.
7. Thread the narrow end through the diagonal band and around the back of the knot.
8. To make a diagonal band on either side, feed through and tighten the pull.
9. Point the tie’s thin end straight up, then tuck it under the loop that encircles your collar so that it emerges to the right of the knot.
10. Wrap your collar in a circle and loop the skinny end of the tie-up around it. Cut some slack in this step.
11. Loop the tip of the thin end around your neck, up through the loop you just made, and tuck it down and to the left.
12. Place the thin end over the top of the collar loop.
13. Slide the remaining thin end beneath the loop around your neck or tuck it under the thick end to keep it hidden. If necessary, tighten by tugging the wide end and adjusting the width of each diagonal band so that they are the same as one another.
Level of difficulty: Difficult to tie
Size of the knot: Medium size knot
Knot Features: Uncommon, Even knot
Recommended Collar: Medium or Full spread collar
Shirt Type: Casual shirt
Tie Fabric: Silk, wool, cotton, linen, and polyester
Formality: Casual and social wear
Choice to pair with: Suit, Blazer, casual outfit
Shape: Asymmetrical layered shape
Advantages
- It looks impressive and is sure to turn heads.
- The Eldredge Knot is relatively easy to untie because of the way it is tied.
Disadvantages
- Difficult to tie.
- Because of the way it is tied, the Eldredge Knot can create a lot of bulk.
- The Eldredge Knot may not be appropriate for all occasions.
15. Trinity Knot

1. The necktie should be draped over your collar with the seam facing inside and the thick end hanging on your right at the desired length.
2. Cross the narrow end diagonally before the thick end, making an X, and tuck it below the loop surrounding your neck.
3. Reverse the narrow end over the loop’s top.
4. Slide the thin end behind the thick end horizontally.
5. The thin end should be flipped over the top of the collar loop.
6. On the far right side of the knot, tuck the thin end’s tip below the loop that wraps around your neck.
7. Go from right to left, horizontally across the front of the knot with the narrow end. Slide a finger below the horizontal band.
8. Thread the thin end through the horizontal band and under the loop around your collar. Just above the knot, slide a finger underneath the pointed end.
9. From right to left, wrap the thin end behind the thick end.
10. Pass the narrow end’s tip through the little vertical loop you prepared in step 8 and the circle around your collar.
11. Squeeze the narrow end into place by pulling it through the vertical loop while maintaining a diagonal angle to your right and upward.
12. Remove all the slack from the knot and make any required adjustments to the three visible folds so they are all the same size and angle. Put the thin end beneath the loop around your collar or behind the thick end.
Level of difficulty: Difficult to tie
Size of the knot: Medium size knot
Similar name: Triquetra Knot
Knot Features: Uncommon, Even knot
Recommended Collar: Narrow Spread collars, cutaway collars, club collars, and rounded collars
Shirt Type: Casual shirt and dress shirt
Tie Fabric: Cotton, linen, silk, chiffon
Formality: Social occasions, formal events, wedding reception, party
Choice to pair with: Vest, Suit
Shape: Trilateral symmetry
Advantages
- The Trinity Knot has a long history in Celtic art and is said to represent the interconnectedness of the earth, sky, and sea.
Disadvantages
- Difficult to tie.
- The Trinity Knot can create a lot of bulk and may not be suitable for all collar types or body types.
- The Trinity Knot may not be appropriate for all occasions, such as formal business settings.
16. Christensen Knot

1. Place the thick end of the necktie on the left and wrap it over your collar. This end must dangle four to six inches below the desired finishing length.
2. From left to right, horizontally cross the thick end in front of the thin end.
3. Bring the thick end horizontally to the left from right behind the thin end.
4. Toggle the thick end up in front of the collar-loop loop.
5. Position the thick end so it emerges on the right side of the narrow end and tucks beneath the loop around your collar.
6. Pull the thick end forward and cross it over the prior horizontal band and the diagonal you made in Step 5. Insert a finger under this horizontal crossing.
7. Wrap the thick end around the knot from left to right.
8. Place the thick end across the front directly on top of the horizontal fold you formed in Step 6. (The fold ought to be still held open with your finger) You can keep both horizontal bands off the collar using just one finger.
9. Insert the thick end of the piece beneath the collar loop.
10. Pull through after tucking the thick end beneath both horizontal crosses.
11. With one hand holding the knot, pull it into position. Now use the other to draw on the narrow end gently. Once the X form of the knot is visible, use your finger to peel out the diagonal folds.
Level of difficulty: Hard
Size of the knot: Large knot
Similar name: Cross Knot
Knot Features: Uncommon, Even knot
Recommended Collar: Spread collars
Shirt Type: Casual and dress shirt
Tie Fabric: Silk, Jacquard, Satin, Wool
Formality: Casual, day-to-day business settings or social events
Choice to pair with: Suit, tweed blazer, denim or chambray shirt, leather jacket
Shape: Diagonal symmetry
Advantages
- The Christensen knot is strong and reliable.
- Making it a good choice for attaching a hook or lure to a fishing line.
- It creates a loop at the end of the line.
- Can be used with both monofilament and braided fishing lines.
Disadvantages
- The knot can be difficult to tie.
- The knot may be prone to slipping if it is not tied tightly enough, which can result in lost fish.

With the step-by-step instructions we’ve provided for each knot, you can easily master the art of tying a perfect knot every time. Remember, practice makes perfect, and with a bit of patience and persistence, you’ll soon be tying knots with ease. So, the next time you’re getting ready for an important event, take the time to perfect your tie knot, and you’ll be sure to make a lasting impression.


